Polycor U
Step It Up: How to Install 7″ Granite Entry Steps
A one-and-done solution, solid stone steps eliminate the need for maintenance or replacement, withstanding the test of time and the harshest of outdoor conditions. Their exceptional density and natural resilience make them especially valuable in colder climates where freeze / thaw cycles take a toll on conventional concrete or wood steps.
Course Description
Elevate your design aesthetic with timeless stone entry steps cut from solid granite blocks that are a rock-solid investment in a home’s curb appeal. In this video, we show step-by-step how to install a set of five-foot entry steps with a landing using 7” thick Eastern Gray granite.
Granite Entry Steps: The One-and-Done Solution for Lasting Curb Appeal
When it comes to creating a lasting first impression, few materials can match the durability, beauty, and longevity of granite entry steps. Made by Mother Nature and quarried from solid blocks of stone, these natural stone steps represent a one-and-done solution that won’t require replacement or maintenance—they will literally outlive us all.
Why Choose Granite Entry Steps?
Stone stairs offer a superior alternative to standard brick, concrete, and synthetic options commonly used for home entrances. While concrete has a compressive strength of 5,000 psi, granite delivers four times that strength with an average of 20,000 psi. This exceptional strength makes natural stone stairs stand up to the elements, especially in colder climates where freeze-thaw cycles take their toll on concrete and mortars.
The benefits of outdoor stone steps extend beyond mere strength:
- No forms to build – Unlike concrete, granite steps come ready to install
- No mortar required – Eliminates the need for scratch coats, stucco, or joints
- No cure times – You can install these self-supporting steps in just a few hours
- Aesthetically pleasing – Natural stone provides timeless beauty
- Maintenance-free – Once installed, granite steps require virtually no upkeep
Understanding Your Project Requirements
Before beginning installation, assess your existing conditions and make necessary corrections. In our demonstration project, we replaced deteriorated concrete, block, and brick steps that had suffered water damage due to lack of flashing and other masonry-related issues. We installed new metal flashing before beginning the granite stone step installation—a crucial step for long-term performance.
Project Specifications
For this installation, we’re using:
- Four 5-foot long entry steps
- One landing piece
- 7″ thick Eastern Gray granite from Polycor’s U.S. quarries
- Split-face edges for natural texture
- Thermal finish surfaces for enhanced slip resistance
Planning and Measurement
Proper planning begins with accurate measurements using 7″ increments to account for step thickness and the top landing in relation to the door threshold and base material. Whether you’re building stone stairs on a concrete pad or densely graded aggregate base, proper sizing and centering on the door are crucial.
Base Requirements
The base should extend 6″ beyond the front, left, and right sides of the finished outdoor stone stairs. For our project, the concrete pad measured 72″ wide and 87″ front to back. Using the 7″ increment rule, four steps plus the landing equals 35″ in height, with approximately 6″ from the top of the landing to the door threshold.
Weight Considerations
Stone front steps have considerable weight due to their solid stone construction:
- A 13″ x 60″ x 7″ step weighs approximately 525 pounds
- A 3′ x 5′ x 7″ landing weighs about 1,400 pounds
This substantial weight necessitates proper lifting equipment for safe and precise installation.
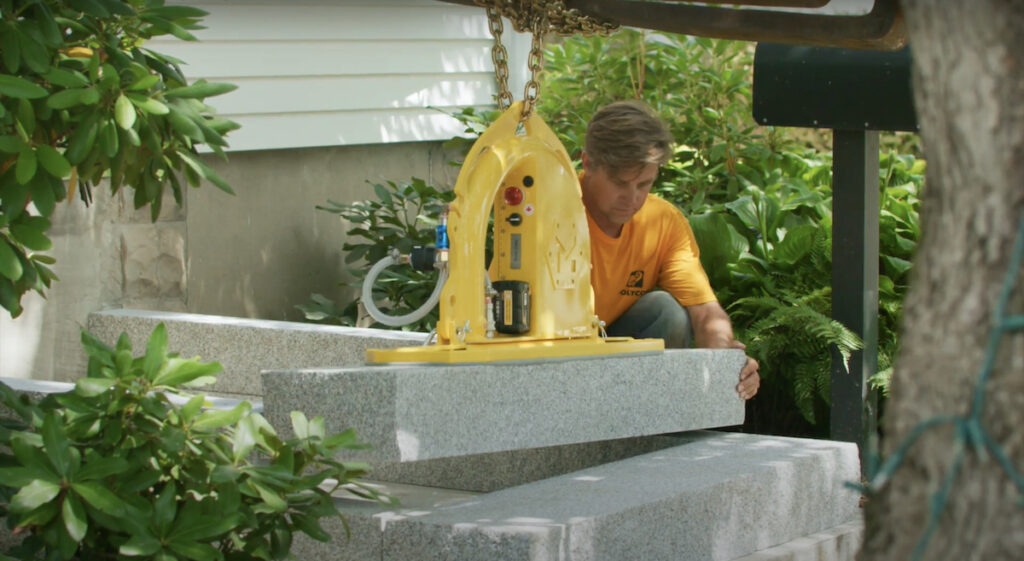
Essential Equipment: Modern Lifting Solutions
Instead of traditional straps, we recommend state-of-the-art vacuum lifting equipment when learning how to build stone steps. The MQuip MK2 vacuum lifter represents the new standard in battery-powered, self-contained vacuum lifters for natural stone installations. With a 3,000-pound capacity running on an 18V lithium-ion battery, this Canadian-manufactured equipment sets new standards for hardscaper lifting solutions.
Vacuum lifters provide several advantages:
- Precision placement – Exact positioning without guesswork
- Safety – Eliminates dangerous manual lifting
- Efficiency – Faster installation with fewer workers
- Damage prevention – Reduces risk of stone damage during handling
Step-by-Step Installation Process
1. Initial Preparation and Measurement
Begin by verifying measurements of all stone stair steps and fillers. Granite is a natural material with slight thickness variations. If differences exist, reserve these pieces for the first, bottom layer where adjustments are easier to make without visible shim work.
For proper drainage, ensure the concrete pad is pitched away from the home. If the pad is level, pitch the first tier of steps and fillers away from the home—¼” over 4 feet of length is sufficient.
2. First Tier Installation
Start by setting the longest pair of step fillers (6 feet in this case) onto the concrete or gravel pad perpendicular to the home foundation. Space them evenly so the measurement from the outside edges of the split-face granite equals the length of the step to be installed on top (5 feet in this case).
Using the vacuum lifter attached to a loader with properly rated chains or straps:
- Center the vacuum lifter pad on the step
- Allow it to reach necessary pressure
- Keep hands and feet clear during lifting
- Set the 5-foot step flat on the pad, directly in front of the two fillers
- Align outside edges of the step flush with filler edges
- Check that tops of fillers and step are flush and level
- Use plastic shims (concrete pads) or additional gravel (aggregate pads) to align heights
3. Building Additional Tiers
Once the first level is properly positioned, pitched, and tested for stability, begin the second tier using two 5-foot step fillers. Repeat the same procedure, ensuring the new step overlaps the one below by one inch to tie everything together structurally.
Continue this process for the third and fourth tiers (or however many your stone exterior stairs project requires). If you’ve followed proper installation procedures, the final step should be stable without movement since the first two layers provide stabilization.
4. Final Landing Installation
The landing represents the culmination of your installation. Secure the vacuum lifter and carefully lift the piece into position just above the last tier of steps. Ensure proper alignment and slowly lower the piece into place, checking alignment throughout the process. Once positioned, release the lifter and verify the landing is properly seated.
Quality Control and Finishing
Throughout the installation process, measure frequently to ensure all components fit properly at each level. Check for:
- Level alignment – All steps should be properly leveled
- Proper overlap – Each step should overlap the one below by one inch
- Stability – No movement or rocking in any component
- Drainage – Proper pitch away from the home
Use plastic shims where needed, placing them toward the inside of filler or step edges to avoid visibility in the finished product.
Long-Term Performance Benefits
When it comes to outdoor stairs, granite entry steps are impossible to beat from both performance and aesthetic standpoints. The investment in quality natural stone pays dividends through:
- Exceptional durability – Granite withstands decades of use and weather
- Timeless appearance – Natural stone beauty never goes out of style
- Low maintenance – Once installed, granite requires virtually no upkeep
- Weather resistance – Superior performance in all climates
- Property value – Natural stone enhances curb appeal and home value
Professional Installation Considerations
While granite entry steps can be installed by experienced DIY enthusiasts, the weight and precision requirements often make professional installation the preferred choice. Professional installers bring:
- Proper equipment – Access to vacuum lifters and other specialized tools
- Experience – Knowledge of proper techniques and potential challenges
- Safety protocols – Trained handling of heavy stone materials
- Warranty protection – Professional installation often includes warranty coverage
Choosing the Right Granite
Polycor Hardscapes & Masonry offers a variety of granite options for entry steps, each with distinct characteristics:
- Eastern Gray – Consistent medium gray color with excellent durability
- Bethel White – Bright white appearance with subtle gray speckling
- Caledonia – Dark gray with distinctive crystal patterns
- Saint Henry Black – Deep black with metallic crystal highlights
Consider your home’s architectural style, existing materials, and personal preferences when selecting granite color and finish options.
Maintenance and Care
One of granite’s greatest advantages is its minimal maintenance requirements. To keep your granite entry steps looking their best:
- Regular cleaning – Sweep debris and rinse with water as needed
- Winter care – Use plastic snow shovels to prevent scratching
- Avoid harsh chemicals – Mild soap and water are sufficient for cleaning
- Inspect annually – Check for any settling or shifting (rare with proper installation)
Investment in Excellence
Granite entry steps represent more than just functional access to your home. They’re an investment in lasting beauty and performance. The durability of natural stone means you’ll never need to replace these steps, making them a cost-effective choice over the long term.
Ready to transform your home’s entrance with the durability and beauty of granite entry steps? Contact a Polycor expert today to explore your options and find the perfect natural stone solution for your project.


