Polycor U
How To Install A Granite Slab Paver Patio In Half The Time With EZ Base
Just like 201, but WAY more fun! I mean, really really fun!
Creating out-of-the-box stone designs is one of the advantages of working with pattern pavers, and granite pavers will stand the test of time while providing a wide range of pattern options. See how to install granite pattern pavers faster by using high-density foam panes in place of traditional dense graded bases.
Course Description
In this video we will demonstrate a time-saving method of installing granite slab pattern pavers over EZ Base after a shallow excavation of only the top few inches of organics. This system offers many advantages that contractors find particularly useful in the right applications.
Paver Patio Installation with Woodbury Gray Granite
There’s no substitute for natural stone when it comes to outdoor projects – it’s naturally durable, fade proof, and virtually maintenance free. Natural stone pavers offer unmatched longevity and beauty that only improve with age, creating outdoor living spaces that will be enjoyed for generations. In this comprehensive guide, we’ll cover the essential details to achieve a successful paver patio installation using Woodbury Gray™ granite slab pavers.
Granite pavers represent the pinnacle of hardscape materials, combining exceptional durability with sophisticated aesthetics. Woodbury Gray™ granite, with its consistent color and fine-grained texture, provides the perfect foundation for elegant outdoor entertaining spaces that withstand decades of use while maintaining their original beauty.
Planning and Layout: Foundation of Success
Every successful paver installation begins with careful planning and precise layout. Map out the designated patio area by running lines and squaring up edges and corners using the 3-4-5 triangle method or professional surveying equipment. This initial accuracy determines the quality of your entire installation, as errors compound throughout the project.
For this project, an alternative method was used to save both time and labor while maintaining professional results. Rather than traditional excavation and base preparation methods, modern techniques allow for more efficient installations without compromising long-term performance.
Proper planning also involves considering drainage patterns, existing landscape features, and how the new patio will integrate with surrounding hardscape elements. Take time during this phase to visualize the completed project and make any necessary adjustments before excavation begins.
Excavation and Subgrade Preparation
Begin excavating the paver area, removing sod and organic materials to approximately 4″ total depth. This excavation removes unstable organic matter that could decompose and cause settling, while providing space for the base system that will support your pavers.
During excavation, pay careful attention to maintaining consistent depth across the entire area. Use a laser level or string lines to ensure accuracy, as variations in excavation depth will telegraph through the finished installation.
Grade the excavated area properly, maintaining a 2% slope away from structures for proper drainage. This subtle slope – approximately ¼” per foot – ensures water flows away from buildings while remaining virtually imperceptible to users of the finished patio.
Bring up any low spots with densely graded angular limestone, creating a uniform subgrade that will support the base system evenly. Angular limestone provides excellent compaction characteristics and superior load-bearing capacity compared to rounded gravels.
Critical Compaction and Stabilization
Compact the subbase thoroughly with a plate compactor, making multiple passes to achieve maximum density. Proper compaction at this stage prevents future settling that could cause pavers to shift or become uneven over time.
The compaction process should be systematic, overlapping each pass to ensure complete coverage. Test compaction by walking across the surface – properly compacted subgrade should show minimal deflection under foot traffic.
Place down woven geosynthetic fabric over the compacted subgrade. This separation layer prevents fine particles from migrating upward into the base system while allowing for proper drainage. The fabric also provides additional stability and extends the life of your paver installation.
Advanced Base System Installation
Bring in ¾” of concrete sand, carefully checking the level and pitch of screed rails before compaction. This sand layer provides the final leveling bed for the EZ Base system while maintaining the proper drainage slope established during excavation.
Compact the sand layer lightly to create a stable working surface. Over-compaction at this stage can create an impermeable layer that interferes with drainage, so use restraint during this process.
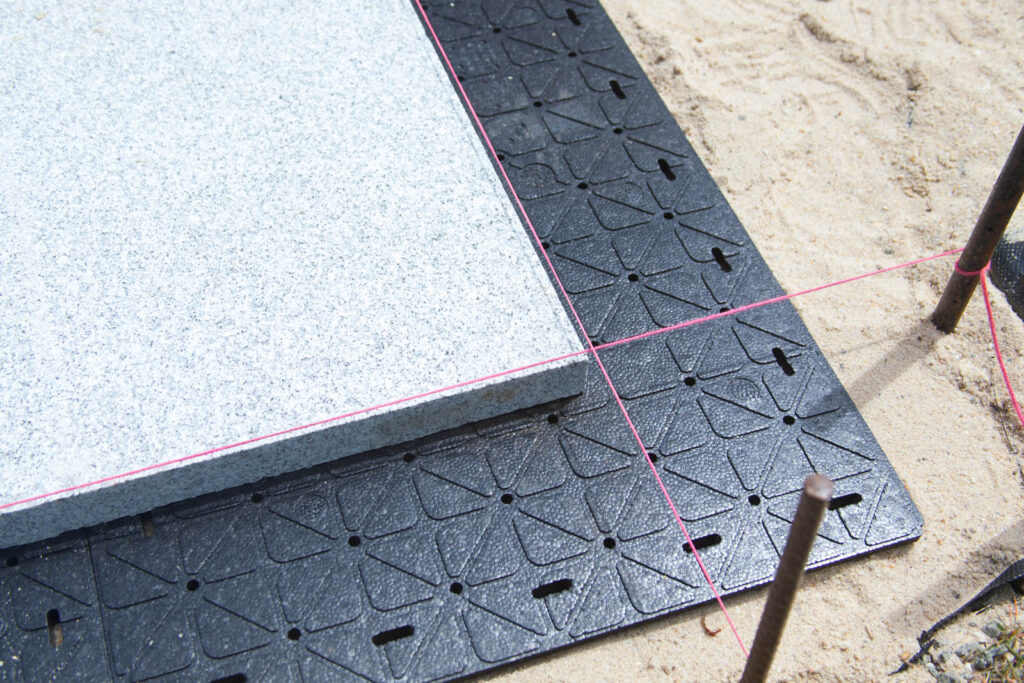
Lay EZ Base panels onto the sand bed, extending them 6″ beyond the finished paver edge on all sides. EZ Base is a revolutionary high-density foam panel system that replaces traditional compacted aggregate-base installations, saving up to 8″ of excavation while providing superior performance.
The 6″ extension beyond the paver edge provides critical edge support that prevents lateral movement and maintains long-term installation integrity. This extended support is particularly important for vehicular applications or areas subject to heavy loads.
Establishing Reference Lines and Pattern Layout
Establish a square line to start laying pavers using the longest, straightest edge available – typically where the patio meets a building or existing hardscape feature. This reference line becomes the foundation for your entire installation pattern.
This project uses 1½” thick granite pavers in a Chesapeake pattern incorporating 1×2, 2×2, and 2×3 foot sizes. The Chesapeake pattern provides visual interest through varied module sizes while maintaining the clean, contemporary appearance that granite pavers deliver.
Before beginning installation, lay out several pattern repeats dry to understand the sequence and identify any potential cutting requirements. This planning prevents mistakes during permanent installation and ensures efficient material usage.
Professional Installation Techniques
Modern paver installation benefits from specialized equipment that improves both efficiency and ergonomics. Pave Tech’s powerful MITE vacuum lifter increases installation efficiency while allowing installers to work more ergonomically and make quick adjustments of laid pavers easier.
The vacuum lifter eliminates the physical strain of repeatedly lifting heavy granite pavers while providing precise control during placement. This tool is particularly valuable when working with large-format pavers that can weigh 50 pounds or more.
It’s recommended to use spacers to help maintain consistent paver spacing and joint alignment throughout the installation. These temporary guides ensure uniform joint widths that contribute to the professional appearance of the finished patio.
Repeat the established pattern systematically, continuing to check for square alignment at regular intervals. Small deviations early in the installation can become major problems as the pattern progresses, so frequent checking prevents costly corrections later.
Critical Edge Restraint Installation
Install 5/8″ low profile aluminum edge restraints from Techniseal with 10″ stakes around the entire perimeter of the paver installation. Edge restraint is absolutely critical for long-term performance, preventing lateral movement that could cause joint separation or paver settling.
The aluminum restraint system provides superior holding power compared to plastic alternatives while remaining virtually invisible in the finished installation. The 10″ stakes anchor the restraint system securely, even in challenging soil conditions.
Position edge restraints tight against the pavers with no gaps that could allow movement. The restraint should bear firmly against the paver edges while maintaining proper alignment with the established pattern.
Professional Joint Filling and Finishing
Prepare for joint filling by ensuring all pavers are properly seated and aligned. Any adjustments should be made before joint filling begins, as modifications become much more difficult after sand installation.
Here, Techniseal’s NOCO non-compactable polymeric sand provides superior joint stabilization compared to traditional sands. This advanced material hardens after activation, creating stable joints that resist weed growth and ant infiltration while allowing for natural stone movement.
Sweep and fill joints completely, working the sand into all voids using a soft-bristled broom. Take care to avoid scratching the granite surface, particularly with darker stones where marks are more visible.
Use a leaf blower to remove excess sand from paver surfaces, ensuring clean joints and preventing surface staining during activation. Follow with a small brush to smooth joint surfaces and ensure consistent appearance.
Activation and Curing Process
Wet the surface according to bag instructions, ensuring complete activation of the polymeric sand throughout all joints. The wetting process should be thorough but controlled – too much water can wash out the sand, while insufficient water prevents proper activation.
Remove excess water with a leaf blower to prevent surface staining and ensure proper curing. The surface should be damp but not standing in water during the curing process.
Make sure to follow all bag instructions carefully, as proper activation is critical for joint performance. Allow the installation to cure for 7 days before subjecting it to heavy traffic or cleaning procedures.
The Polycor Advantage in Paver Selection
Polycor’s wide assortment of slab, small format, and plank pavers will lend a refined, finished appearance to any project. The company’s commitment to quality quarrying and fabrication ensures consistent color, texture, and dimensions that professional installers demand.
From intimate residential patios to expansive commercial plazas, Polycor’s natural stone pavers provide the durability and beauty that make outdoor spaces truly exceptional. The investment in natural stone pavers pays dividends through decades of maintenance-free performance and timeless aesthetic appeal that never goes out of style.


