Polycor U
How To Install Stone Pavers On An Open Graded Base
Natural stone paving prefers a base that is well-drained, and open graded bases provide the best solution for permeability. See how it’s done.
Course Description
Versatility, permeability, and durability. Learn how to install a limestone paver walkway on an open graded base.
How To Install Limestone Pavers On An Open Graded Base: A Comprehensive Guide
Natural stone pavers bring unmatched beauty and durability to outdoor living spaces, but the performance depends significantly on the installation method you choose. While densely graded bases have traditionally been the standard, open graded bases are gaining popularity for their superior water management capabilities and environmental benefits. This installation approach creates a permeable system that allows rainwater to penetrate through to the subsoil rather than directing it to storm drains or causing runoff issues.
Why Choose an Open Graded Base?
Unlike densely graded bases that use a mix of various-sized aggregates compacted tightly together, open graded bases utilize uniformly sized crushed stone with minimal fines. This creates void spaces between the stones that allow water to move freely through the base. The advantages include:
- Better long-term stability for your paver installation
- Improved water management and drainage
- Reduced risk of frost heave in cold climates
- Enhanced environmental benefits through natural water filtration
- Less susceptibility to settling and cracking

Materials and Tools Needed
Before starting your project, gather these essential materials:
- Indiana Limestone pavers from Polycor
- ASTM No. 57 stone (¾” clean, angular crushed stone)
- ASTM No. 8 stone (⅜” clean, angular crushed stone)
- Geotextile membrane
- Bi-axial geogrid (optional for enhanced stability)
- ⅜” spacers
- Aluminum edge restraint system
- String lines and stakes
- Level and screed rails
- Plate compactor
- Wet saw with diamond blade
- SDS Max hammer drill with attachment
- Shovels and rakes
Step-by-Step Installation Process
1. Planning and Preparation
Proper planning is crucial for a successful installation. For this project example, we’ll be installing a limestone patio against a home’s foundation wall with a crawl space.
- Determine the layout and mark the area using string lines
- Plan for water diversion from the start of the project
- Contact utility companies by calling 811 to mark underground utilities before excavation
- Calculate the required material quantities based on your project size
2. Excavation
The depth of excavation will determine the stability of your finished patio:
- Excavate to a depth of 8-10 inches for a patio or walkway
- Ensure a minimum base thickness of 6-8 inches
- Maintain a slope of 3/16″ per foot away from the foundation throughout the entire installation
- Extend the excavation beyond the planned paver edge by the thickness of the base to allow for proper edge restraint installation
3. Base Installation
Creating a proper base is the most critical step for long-term performance:
- Line the excavated area with geotextile membrane to prevent migration of the subsoil into the base stone
- Spread ASTM No. 57 stone (¾” crushed, angular stone) in 2-4 inch lifts
- Lightly moisten each lift before compaction
- Compact each lift thoroughly, checking to maintain proper slope throughout
- For additional structural stability, consider incorporating a bi-axial geogrid between layers
- Continue until you reach the desired base height, leaving room for the bedding layer and pavers
Want to see this installation technique in action? Visit Polycor U to watch our step-by-step video tutorial on installing limestone pavers over an open graded base.
4. Bedding Layer Preparation
The bedding layer provides a smooth, level surface for the pavers:
- Remove the pipes and fill any voids, eliminating imperfections
- Spread a 1-inch layer of ASTM No. 8 stone (⅜” clean, angular stone)
- Set 1-inch diameter pipes as screed guides to establish the proper grade
- Use a straight board to screed the stone, creating a smooth, level surface

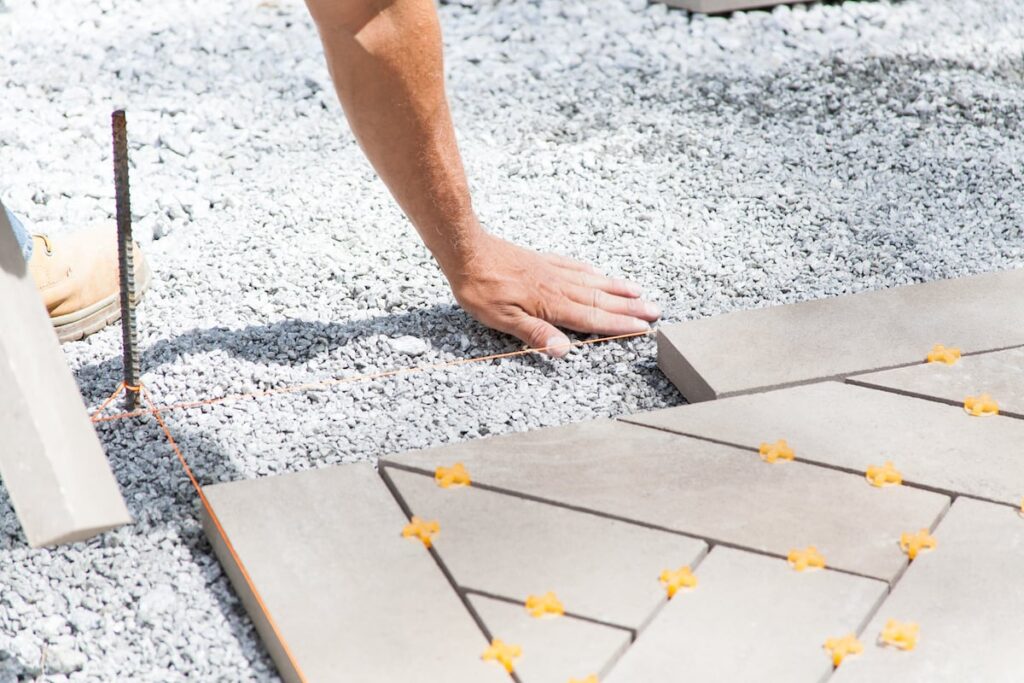
5. Paver Installation
Now comes the rewarding part—placing your beautiful Indiana Limestone pavers:
- Begin by establishing a 90-degree corner using the 3-4-5 method to ensure square alignment
- For this project example, we’re using Indiana Limestone Full Color Blend pavers in a herringbone pattern
- Pre-cut 45-degree angles for the starter course using a wet saw with a diamond blade
- Work from multiple pallets simultaneously to effectively blend the stone colors
- Use ⅜” spacers to maintain consistent joint spacing
- As you approach the walls, mark pieces that need cutting
- An overlay method is effective for marking multiple pieces without extensive measuring
- Cut pieces with a diamond saw and continue the installation
6. Edge Restraint Installation
Edge restraints prevent lateral movement and maintain the integrity of your paver installation:
- Install proper edge restraints according to product specifications
- For this project, we used the Quick-E-Hybrid aluminum edging system from Pave Tool
- Remove any bedding material from the paver edge
- Position the aluminum edging against the pavers
- Using an SDS Max hammer drill with a Quick-E bit, drive the stakes firmly into place to secure the edging
7. Joint Filling and Finishing
The final step completes the installation and stabilizes the paver system:
- Fill joints with ASTM No. 8 or No. 9 aggregate (small chip stone is preferred)
- Sweep the stone across the surface to ensure complete joint filling
- For a hybrid pavement approach, polymeric sand can be used following the manufacturer’s recommended installation method
- Thoroughly clean the paver surface of any remaining debris or dust
Tips for Success
Monitor slope throughout installation to maintain the critical 3/16″ per foot grade away from your foundation. Work from multiple pallets simultaneously to create natural color variation and prevent clustering of similar-toned pavers. Use a quality wet saw with a diamond blade for clean, precise cuts, and plan installation during moderate weather conditions for best results. Allow for natural settling of the open graded base during the first few months, which can be addressed with additional joint material if needed.

Design Considerations
Indiana Limestone pavers offer exceptional design versatility. Consider running bond, basketweave or random patterns beyond traditional herringbone layouts. Create visual interest with contrasting border courses and combine different paver sizes for dynamic appearance. Choose from smooth, textured or antiqued surface finishes to achieve your desired aesthetic and performance requirements.
Maintenance Recommendations
Open graded base installations require minimal maintenance due to superior drainage characteristics. Occasionally replenish joint material and keep surfaces clean by sweeping away debris. Use only limestone-approved stone cleaners for stubborn stains. In freezing climates, avoid deicing chemicals and use sand for traction to protect the stone’s natural composition.
The Polycor Advantage
Polycor’s Indiana Limestone pavers are quarried in North America, ensuring quality and ethical sourcing. Our stones offer consistent coloration and durability proven by centuries of performance in iconic architectural projects. We provide comprehensive technical support and resources for successful installation, backed by environmentally responsible manufacturing practices.

Conclusion
Installing limestone pavers on an open graded base combines the timeless beauty of natural stone with modern, environmentally conscious construction techniques. This permeable system provides excellent drainage, stability, and longevity for your outdoor living space.
By following these detailed steps and best practices, you can create a stunning limestone paver installation that will endure for generations while effectively managing water runoff and enhancing your property’s overall drainage capabilities.
Ready to start your limestone paver project? Contact a Polycor expert today to discuss the perfect stone selection for your specific needs and design vision.
For more installation techniques and product information, explore the full range of educational resources at Polycor U, your comprehensive source for mastering natural stone hardscaping.


