Polycor U
How to Install Vanderbilt Thin Veneer on a Wood Framed Wall
A home’s exterior siding colors, textures and patterns all play a significant role in defining the design and style of a home, whether it be modern, rustic, farmhouse, or minimalist. Few materials can compare to the timelessness and lasting appeal that natural stone offers.
Course Description
In this video we’ll be highlighting the versatility of a classic natural stone veneer and demonstrating one of the more contemporary methods of installation without the standard lath and scratch coats.
How To Install Vanderbilt Thin Veneer On Wood Framed Stud Wall
The unmatched beauty of genuine limestone stone veneer makes it the ideal accent for any home’s aesthetic, whether modern, rustic, farmhouse, or minimalist. With thin limestone veneer, you can incorporate that same impactful look in more ways than ever, transforming ordinary walls into stunning architectural features that define your home’s character.
A home’s exterior siding colors, textures, and patterns all play significant roles in defining its design and style. Few materials can compare to the timelessness and lasting appeal that natural limestone siding offers, creating lasting value that enhances your property for generations.
Understanding Vanderbilt Classic Veneer
Vanderbilt Classic veneer represents part of Polycor’s Estate Veneer Series, a comprehensive line of limestone veneer products cut from natural stone originating from local North American quarries. This veneer is distinguished by its smooth, flat surface and precisely cut rectangular and square edges that create clean, contemporary lines.
Despite its historical origins, Indiana Limestone isn’t locked into any single architectural style. Our demonstration project employs 4″ Indiana Limestone – Full Color Blend from Polycor’s quarries, creating a linear, plank style pattern that complements modern architectural elements while honoring stone’s timeless appeal.
Vanderbilt Classic is available in marble, granite, and limestone, produced in four heights ranging from 4″ to 16″ with a consistent 1⅜” thickness. While multiple heights can be mixed together in ashlar type patterns, it’s most often installed using uniform heights for clean, linear appearances that create an impressive stone front on house applications.
Wall System Preparation: Building the Foundation
When installing stone on frame construction, the wood stud wall system requires careful preparation to ensure optimal performance and longevity. Our installation features plywood sheathing with multiple protective layers: a weather resistive barrier (Henry® Blueskin® Air and Vapor Barrier), followed by felt paper, then cement board, and finally a liquid applied WRB below the veneer.
Begin by evaluating the sheathing to ensure surfaces are sound, dry, and clean. Start at the bottom of the wall, peel back the protective film, and press firmly into place, working from the center outward while removing wrinkles and air bubbles. Install in shingle style fashion, overlapping joints a minimum of 3 inches.
Apply 15 pound asphalt impregnated felt paper to the wall and secure with staples, overlapping all joints. Attach cement board sheets to the wall, staggering end joints in successive courses and driving fasteners at maximum 8 inch centers. Mud and tape all joints with 4 inch alkali resistant fiberglass mesh tape.
Apply a roll on, liquid water/air resistive barrier to the cement board per manufacturer instructions, ensuring complete coverage. Finally, apply sealants to all windows, doors, and adjoining materials to complete the weatherproofing system.
Advanced Installation Systems: MVIS Technology
Modern veneer installations benefit from polymer fortified setting materials that provide superior performance compared to traditional mortars. For this installation, we’re using Laticrete MVIS (Masonry Veneer Installation System), which provides productivity boosting performance designed to deliver superior, long term results while exceeding ASTM C270 compressive strength requirements.
“The advancement in adhesive technology has completely changed how we approach veneer installation,” explains a professional mason specializing in natural stone applications. “Products like MVIS provide the strength and workability we need while significantly reducing installation time compared to traditional methods.”
Installation Process: Professional Techniques
Establishing Reference Lines
Begin by establishing level lines and snapping chalk lines corresponding to the coursing and finish heights of the veneer and limestone veneer stone sills at windows. Attach a ledger board to the wall, ensuring it’s perfectly level for the starter course of veneer.
The Vanderbilt Classic veneer is available with quirk miter corners for outside edges where seamless aesthetics are desired. Attach another ledger board to the adjoining wall, level with the first board, and dry fit the miter joint ensuring perfect alignment.
Before installation, clean the back of each stone to remove any dust or excess film that could impede proper bonding. This preparation step is crucial for achieving the complete adhesion necessary for long term performance.
Mortar Application and Veneer Installation
Mix MVIS Veneer Mortar with water to the desired consistency using a paddle mixer and drill, following manufacturer recommendations (approximately 3.4 parts powder to 1 part water). Many contractors also use spec mix stone veneer mortar for consistent performance. Mix for one minute or until achieving a creamy, smooth consistency. Allow the mixture to slake for 5 minutes, remix, and begin use.
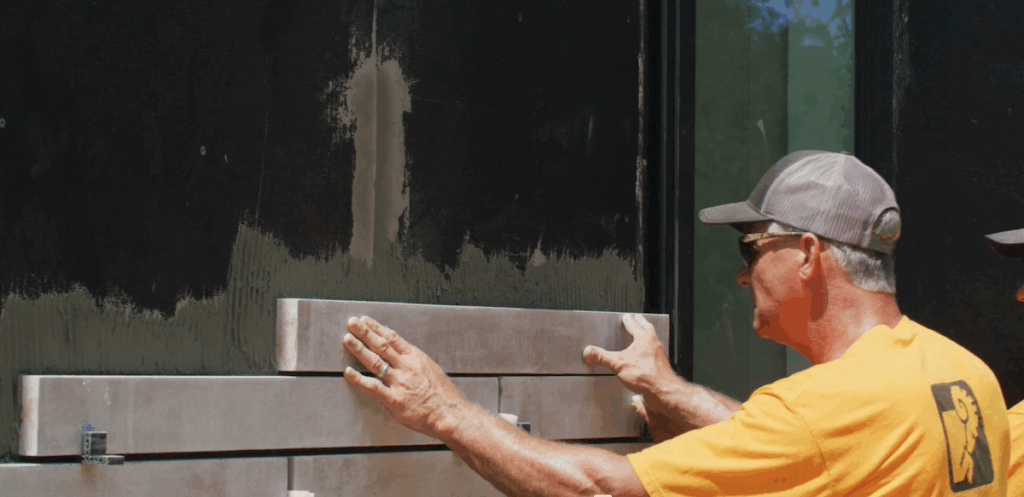
Key a skim coat of mortar to the wall approximately ½” to ¾” thick using the flat side of a ½” x ½” notched trowel. Once applied, turn the trowel to the notched side, hold at a 45 degree angle, and run grooves into the mortar. Spread only enough mortar that can be covered with veneer within 15 to 20 minutes.
Back butter the entire rear of the flat stone veneer with a thin skim coat of mortar using a margin trowel. Install the veneer into the desired location by applying firm pressure, locking it into the mortar bed, then slide it roughly 1″ to 1½” away from the final position and back into place with spacers while maintaining even pressure.
This sliding technique ensures the mortar is fully embedded in the space between veneer and wall, with excess mortar squeezing out around edges indicating proper adherence with 100% coverage to both substrate and stone. This method is particularly important for thinset stone veneer applications.
Window Sill Installation
Continue working up the wall and inward with veneer flats from the quirk miter corner pieces, using spacers to maintain equal joint widths of typically ⅜”. Stone sills from Polycor’s Hardscapes & Masonry line provide 3″ depths and 48″ lengths for adequately sized reveals over the veneer.
Dry fit the stone sill into the allotted space and check for accuracy. Pitch the sill approximately 15 degrees for proper slope and water drainage while leveling with shims underneath. Apply veneer mortar to the top course of veneer as well as to the sill’s back side, pressing firmly into place while maintaining proper pitch.
Joint Finishing: Professional Craftsmanship
Type N mortar is generally used for jointing, made from Portland cement, hydrated lime, and dried masonry sand. Type N is best suited for jointing because it has lower PSI strength and won’t add excessive pressure into joints that could damage the stone.
Pull all spacers from joints in preparation for the mortar job. Mix mortar with water and a paddle mixer attached to a drill to obtain flowing consistency like smooth cake batter. Using a grout bag, begin squeezing mortar into all joints working from bottom upward.
Once mortar is thumb print hard (approximately 15 minutes), begin tooling joints with a masonry jointer. Press and rake mortar into joints, shaping them as you work. Tool vertical head joints first, then follow with long, continuous strokes along horizontal joints. After mortar has been tooled and fully cured, use a nylon brush to sweep all joints and eliminate any excess.
Design Versatility: From Classic to Contemporary
This installation demonstrates how versatile natural stone veneer can be across architectural styles. This residence is definitely modern, yet the iconic nature of Indiana Limestone ties into the story of the home itself. The architect firm is based in New York City, where many famous buildings are constructed with Indiana Limestone, including Grand Central Station and Rockefeller Center.
This historical connection, combined with the stone’s creamy, consistent buff color, inspired the homeowner and architect to specify Indiana Limestone for the project. The result showcases how traditional materials can be applied using contemporary techniques to create thoroughly modern expressions.
Investment in Timeless Beauty
Installing Vanderbilt Classic thin veneer represents more than just aesthetic improvement—it’s an investment in your property’s long term value and appeal. The combination of genuine natural stone with modern installation techniques creates surfaces that enhance your home’s character while providing the durability expected from quality materials.
The linear, contemporary application demonstrated here proves that traditional materials can be used to create thoroughly modern expressions. By understanding both the material’s capabilities and proper installation techniques, you can achieve results that honor stone’s historical significance while meeting contemporary design objectives.
Ready to transform your home’s exterior with the timeless beauty of natural stone veneer? Contact a Polycor expert today to explore how Vanderbilt Classic and other Estate Veneer Series products can enhance your architectural vision. From veneer to pavers to steps and treads, Polycor Hardscapes & Masonry provides your complete resource for everything natural stone has to offer.


