Polycor U
Upgrade Your Outdoor Lighting: How To Install A Granite Lamp Post
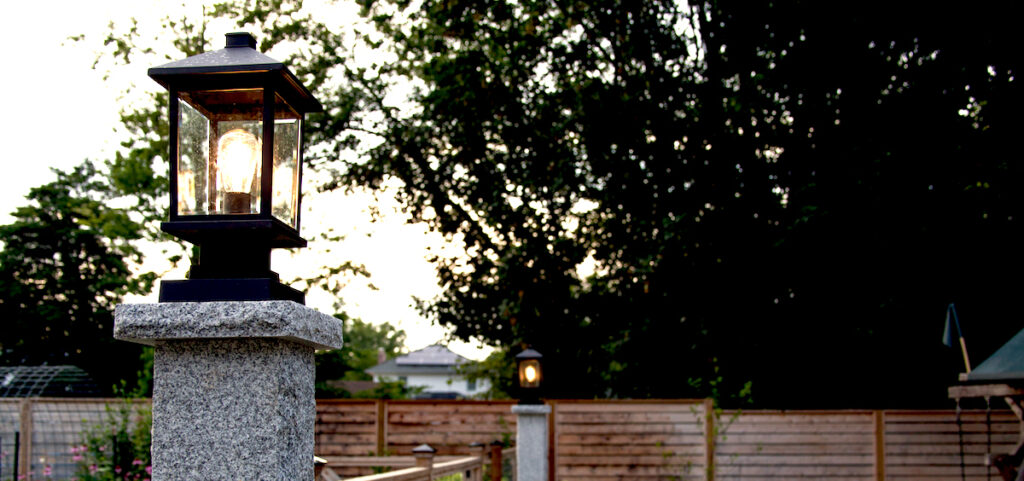
Light up your landscape with granite lamp posts. While installing a granite lamp post on your property might seem like the cherry on top of your landscape design, outdoor lighting is critical for helping to establish borders and edges and illuminating key landscape features. Really, it’s more of the cake than the icing.
Course Description
In this video, we show step-by-step how to install a granite lamp post that is pre-drilled for wiring, complete with a granite post cap. These lighting fixtures will last forever and provide a unique detailing to outdoor living spaces.
Granite Lamp Post Installation: A Complete Guide
If you are ready to light your landscape, create a rustic fence line, or upgrade your mailbox with a granite post, it’s important to understand that proper installation begins with the foundation. A post hole is much more than simply a hole in the ground – it’s a narrow, straight, and deep cut into the earth at a specific size and particular location that may contain obstacles such as large stones, roots, or utility lines.
Polycor granite posts add instant appeal to any outdoor space, transforming ordinary landscapes into sophisticated outdoor environments. These substantial stone elements serve as focal points that anchor landscape designs while providing practical functions like lighting, mailbox support, or fence definition. When digging holes for granite posts, there are critical considerations to address before starting your project to ensure professional results that will last for decades.
Premium Natural Stone Construction
Cut from solid blocks of genuine natural stone from Polycor’s local quarries, granite lamp posts represent the pinnacle of landscape lighting solutions. These posts feature 2 sides split-faced and 2 sides thermal finished, combining natural texture with refined surfaces that complement any architectural style.
The split-faced sides provide organic texture that catches light beautifully throughout the day, while thermal finished sides offer smooth, contemporary surfaces that integrate seamlessly with modern landscape designs. This combination of finishes ensures the posts look appropriate in both traditional and contemporary settings.
Overall measurements are 7 inches x 7 inches x 96 inches high and come pre-drilled through the center for running electrical wire. The pre-drilled channel eliminates the need for field drilling while ensuring proper wire routing that protects electrical connections from moisture and damage. This attention to detail demonstrates the difference between professional-grade products and amateur alternatives.
Critical Planning and Site Preparation
Begin by determining the exact location of the post, reserving enough space to allow for clearance around any obstacles. In this installation, the post is positioned between a patio garden wall and fence, requiring careful measurement to ensure proper proportions and adequate working space.
Mark the center of the post location, ensuring alignment with any prepared wiring or electrical connections. This initial accuracy determines the success of your entire installation, as corrections become increasingly difficult as work progresses.
Before starting any excavation, contact your local utilities company or dial 811 for utility location services. This free service prevents dangerous encounters with buried gas lines, electrical cables, or water mains that could cause injury, property damage, or expensive repairs. Most areas require this notification 48-72 hours before digging begins.
Excavation Requirements and Techniques
Measure an 18″ diameter circle around the marked center point and use marking spray paint to indicate the dig line. This generous diameter provides adequate working space while ensuring sufficient backfill material around the post for maximum stability.
Cut out the appropriate size of sod with a sharp spade or lawn edger to create clean edges that will be easier to restore after installation. Save the sod if it’s in good condition, as it can be replanted around the finished installation.
Use a shovel, post hole diggers, or power auger to excavate the hole to the proper depth – in this case, 30″ deep. The choice of digging tools depends on soil conditions, with power augers being most efficient in normal soils, while hand tools may be necessary around existing utilities or in rocky conditions.
It is recommended to bury the bottom third of the post below grade when complete for optimal stability. For a 96″ post, this means 32″ below grade, though 30″ provides adequate support while allowing for easier installation. Add a few inches of aggregate to the bottom of the hole to provide drainage and a level foundation for the post.
Foundation and Setting Options
Granite posts can be set in either gravel or concrete, each method offering specific advantages. It is recommended to set the post in ¾” washed stone, which is easily permeable, drains well, and provides strong reinforcement while allowing for easier future adjustments if necessary.
The washed stone method offers several advantages over concrete settings. The permeable nature prevents water accumulation that could cause freeze-thaw damage, while the mechanical interlock between stones provides excellent holding power. Additionally, washed stone installations can be adjusted or removed more easily than concrete settings if landscape changes require post relocation.
Concrete settings provide maximum holding power and are preferred in areas subject to high winds or where posts support significant loads. However, concrete settings are permanent and make future modifications much more difficult.
Safe Handling and Installation Procedures
All granite posts weigh approximately 400 pounds each, so proper equipment and safety procedures are essential for safe installation. Never attempt to manually handle posts of this weight, as injury is likely and damage to the stone is possible.
In this installation, a Bobcat with nylon straps wrapped around the forks assists with maneuvering the posts safely and efficiently. The nylon straps protect the granite surface from metal contact while providing secure lifting points. Always ensure lifting equipment has adequate capacity with appropriate safety margins.
Position lifting equipment to allow straight vertical placement of the post. Angled placements can bind the post in the hole or cause damage during installation. Have assistants guide the post during lowering to prevent contact with hole edges.
Precision Installation and Alignment
Once the post is positioned in the hole, begin backfilling with ¾” washed stone in 6-8 inch lifts, compacting each layer before adding the next. This systematic approach ensures uniform support around the entire post perimeter.
Adjust the post for plumb using a long level, checking multiple sides to ensure the post remains perfectly vertical throughout the compaction process. Even small deviations from plumb become obvious as the eye travels up the 8-foot post height, so precision at this stage is critical.
Continue backfilling and compacting until the stone reaches final grade, ensuring the post remains plumb throughout the process. The compaction process locks the stones together, creating a stable foundation that will support the post indefinitely.
Professional Finishing Details
Finish off the lamp post installation by gluing a 10″ x 10″ Polycor granite post cap to the top using appropriate stone adhesive. The cap protects the post top from water infiltration while providing the finished appearance that distinguishes professional installations.
Ensure the cap is centered on the post with equal overhang on all sides. This attention to detail demonstrates quality workmanship and ensures proper water shedding away from the post body.
Add the desired lighting fixture according to manufacturer specifications, routing electrical connections through the pre-drilled channel. Use appropriate weatherproof connections and follow local electrical codes for safe, long-lasting installations.
Long-Term Performance and Value
Properly installed granite lamp posts provide decades of maintenance-free service while adding substantial value to your property. Unlike manufactured alternatives that may fade, crack, or deteriorate, natural granite actually improves with age, developing character through natural weathering while maintaining structural integrity.
These permanent landscape features serve as anchors for your outdoor lighting design while providing the kind of substantial, quality appearance that distinguishes exceptional properties from ordinary ones. The investment in natural stone lamp posts pays dividends through years of reliable performance and timeless aesthetic appeal.


